


Campervan off-grid power: UK lithium battery guide 2026
Build a reliable off-grid campervan power system with lithium batteries and solar. Practical UK guide covering sizing, components, installation, and winter tips.
Running out of power miles from the nearest hookup is one of the most frustrating experiences in campervan travel. A flat battery means no fridge, no lighting, no phone charging, and no comfort. Modern lithium battery systems, paired with solar panels and smart charging, have changed what is possible for UK campervan owners. Core components of a reliable off-grid setup include lithium batteries, MPPT solar controllers, DC-DC chargers, pure sine wave inverters, and battery monitors. This guide covers every layer of that system, from choosing the right battery to sizing solar for British winters.
Table of Contents
- Understanding campervan off-grid power essentials
- Choosing the right battery: lithium vs AGM for UK travel
- How to size your system for true off-grid independence
- Step-by-step: Building your off-grid campervan power system
- How to monitor, maintain, and get the most from your system
- Find trusted lithium, solar and off-grid solutions for your campervan
- Frequently asked questions
Key Takeaways
| Point | Details |
|---|---|
| Lithium batteries offer maximum freedom | Lithium cells provide more usable energy and longer lifespan, crucial for reliable off-grid travel. |
| Correct system sizing prevents power stress | Carefully planning battery and solar size is essential for worry-free, all-weather adventures. |
| Combine solar and DC-DC for UK resilience | Relying on both solar and alternator charging ensures energy independence year-round in the UK climate. |
| Invest in quality components for safety | Choosing trusted batteries, fuses, and monitors secures your comfort and system reliability long-term. |
| Regular monitoring protects your investment | Smart gauges and health checks extend battery life and prevent most power failures before they happen. |
Understanding campervan off-grid power essentials
Every reliable off-grid system is built from the same core building blocks. Understanding what each component does, and how they interact, is the first step to building a setup that genuinely works.
Core system components include lithium batteries, solar with MPPT controllers, DC-DC chargers, and inverters. Together, they form a self-sustaining power ecosystem that captures energy from multiple sources and delivers it safely to your appliances. Learning about solar energy storage for campervans will help you understand how each part contributes to the whole.
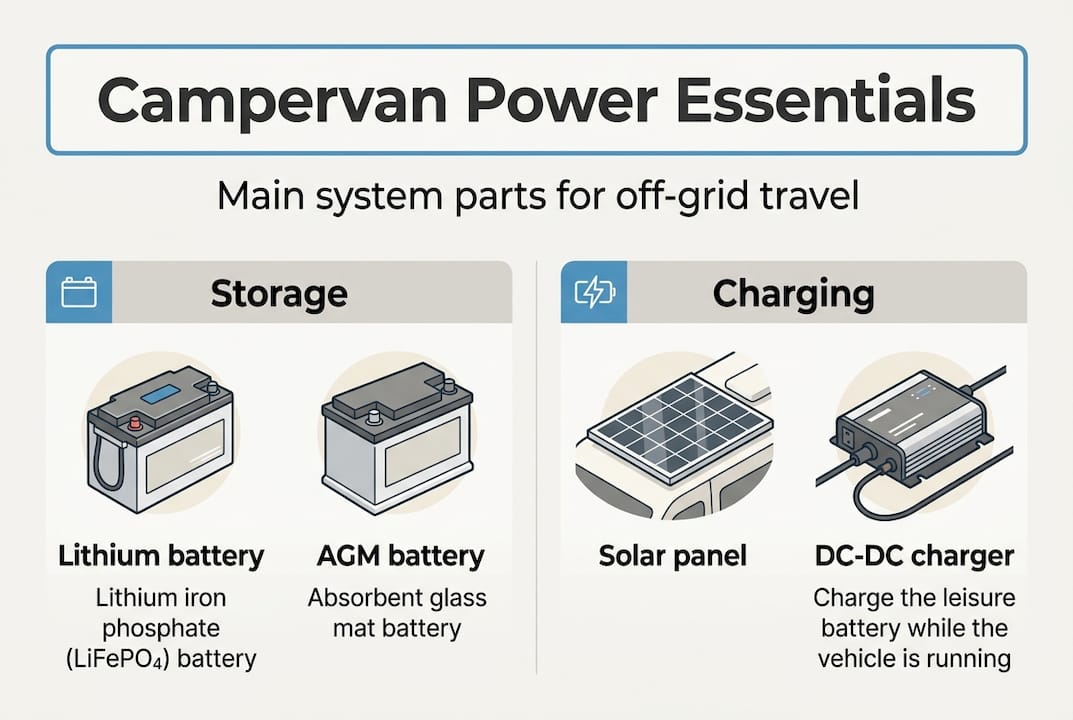
Here is what each component does:
- Lithium or AGM leisure battery: Stores energy for use when solar input is low or absent.
- Solar panels with MPPT controller: Harvest sunlight and convert it efficiently into usable charge. MPPT (Maximum Power Point Tracking) controllers extract up to 30% more energy than older PWM types.
- DC-DC charger (battery-to-battery charger): Safely charges your leisure battery from the vehicle alternator while driving, without damaging either battery.
- Pure sine wave inverter: Converts 12V DC battery power into 230V AC, suitable for laptops, kettles, and other household appliances.
- Battery monitor: Tracks state of charge, voltage, and current in real time so you always know how much power remains.
For a broader look at how these systems are configured, explore the different types of off-grid battery systems used in UK campervans.
| Component | Primary function | Key specification to check |
|---|---|---|
| Lithium battery | Energy storage | Usable capacity (Wh) |
| MPPT solar controller | Charge regulation | Max input voltage, amp rating |
| DC-DC charger | Alternator charging | Output current (amps) |
| Inverter | AC power output | Continuous watt rating |
| Battery monitor | System visibility | Accuracy, Bluetooth support |
Choosing the right battery: lithium vs AGM for UK travel
Choosing the right battery is the foundation for reliable energy. The two main options for UK campervan owners are lithium LiFePO4 and AGM (Absorbent Glass Mat) lead-acid batteries. Each has a distinct profile.
Lithium LiFePO4 batteries offer higher usable capacity, longer cycle life, lighter weight, and lower lifetime cost than AGM. A 100Ah lithium battery delivers around 100Ah of usable energy, whereas an AGM of the same rating should only be discharged to 50% to avoid damage, giving just 50Ah in practice. For a detailed side-by-side, see this lithium vs AGM comparison.
| Specification | Lithium LiFePO4 | AGM lead-acid |
|---|---|---|
| Usable capacity | ~100% | ~50% |
| Typical cycle life | 2,000 to 5,000+ | 300 to 500 |
| Weight (100Ah) | ~12 to 14 kg | ~25 to 30 kg |
| Charge speed | Fast (accepts high current) | Slow (limited acceptance) |
| Cost per cycle | Low | High |
| Low-temperature performance | Needs protection below 0°C | Tolerates cold better |
For regular or full-time off-grid use, lithium is the clear choice. The [lithium benefits over lead acid](https://skyenergi.com/blogs/news/choose-lithium-over-lead acid) are particularly significant for UK travellers who face variable weather and extended trips. AGM still makes sense for occasional weekend use where budget is the primary concern and weight is not critical.
Pro Tip: When reading battery specs, always look at usable capacity in watt-hours (Wh), not just amp-hours (Ah). A 100Ah lithium at 12.8V delivers roughly 1,280Wh usable. An AGM of the same Ah rating delivers closer to 600Wh in practice. For a broader comparison of leading products, review the best lithium batteries compared for campervans.
For occasional campers using a van a few weekends per year, a quality AGM may suffice. For anyone spending weeks or months off-grid, lithium pays for itself through longevity and convenience. The leisure battery guide from Camperbuyer covers gel options too, if you want a full picture.
How to size your system for true off-grid independence
Once you have chosen your battery type, sizing the system correctly is what separates a setup that works from one that fails on day three. Start with your daily energy consumption.
Follow these steps to calculate your daily watt-hour (Wh) requirement:
- List every appliance you use in the van.
- Note the wattage of each appliance (found on the label or in the manual).
- Estimate how many hours per day each appliance runs.
- Multiply watts by hours to get Wh per appliance.
- Add all appliance totals together for your daily Wh figure.
- Multiply by 1.2 to account for system inefficiencies.
| Appliance | Typical wattage | Daily hours | Daily Wh |
|---|---|---|---|
| 12V compressor fridge | 45W | 24 | 1,080 |
| LED lighting | 20W | 5 | 100 |
| Water pump | 60W | 0.5 | 30 |
| Phone and laptop charging | 65W | 2 | 130 |
| Diesel heater fan | 10W | 8 | 80 |
| Total | ~1,420 Wh |
Sizing guidance recommends aiming for 1.5 to 2 days of autonomy, with a 100Ah LiFePO4 providing approximately 1,000Wh usable. For the example above, a 200Ah lithium bank (around 2,560Wh usable) would cover roughly 1.5 days without any solar input.
For solar, UK conditions require realistic expectations. In summer, a 300W panel may generate 900 to 1,200Wh on a clear day. In winter, the same panel might produce 150 to 300Wh. A 300 to 400W solar array is the practical sweet spot for most UK campervans, balancing roof space, weight, and seasonal output. Explore solar setup examples for UK conditions to see how real systems are configured.
Pro Tip: Always size your battery bank and solar array for your worst-case scenario, not your best. Plan for two consecutive overcast days in October, not a sunny July afternoon. Build in a 20 to 30% margin and you will rarely feel short of power. The campervan solar power guide covers UK-specific seasonal planning in detail.
Step-by-step: Building your off-grid campervan power system
With your system sized and components chosen, the build process follows a logical sequence. Rushing this stage is where most problems originate.
- Plan your wiring layout. Map cable runs before cutting anything. Shorter, direct routes reduce voltage drop and heat.
- Install the battery. Secure it in a ventilated, accessible location. Connect the negative terminal last.
- Mount solar panels. Fix panels to the roof using appropriate brackets. Run cables through a waterproof gland into the van.
- Install the MPPT controller. Mount it close to the battery. Connect solar input, then battery output, following the manufacturer’s sequence.
- Fit the DC-DC charger. Wire it between the starter battery and leisure battery. This protects both batteries during alternator charging.
- Install the inverter. Mount close to the battery with short, heavy-gauge cables. Fuse within 300mm of the battery terminal.
- Add the battery monitor. Install the shunt in the negative cable path. Connect the display unit and configure battery capacity settings.
Common mistakes to avoid: undersizing cable gauge (causes heat and voltage drop), skipping fuses on every circuit, and omitting low-temperature protection on lithium batteries. The role of inverters in the system is often underestimated; selecting the correct continuous watt rating matters as much as the battery itself.
Safety note: Voltage drop must remain below 3% across all cable runs. All circuits require appropriate fusing. Lithium batteries need a battery management system (BMS) with low-temperature cut-off if used in winter conditions. If you are unsure about any stage of the installation, consult a qualified auto-electrician. Incorrect wiring is a fire risk. Proper wiring and fusing are non-negotiable for safety and performance.
For winter travel in the UK, build in charging redundancy. Solar alone is insufficient on short December days. A DC-DC charger ensures the battery tops up on every drive, and an EHU (electric hook-up) connection adds a third source when available.
How to monitor, maintain, and get the most from your system
A well-built system still needs regular attention to perform at its best over the long term. Monitoring is not optional; it is how you catch problems before they become failures.
Battery monitors and proper maintenance help to maximise the life and performance of your power system. Key parameters to track include:
- State of charge (SoC): Keep lithium between 20% and 95% for daily cycling to extend lifespan.
- Voltage: Resting voltage gives a reliable indication of charge level when no load is present.
- Temperature: Lithium cells must not be charged below 0°C without a built-in heater.
- Cycle count: Most quality BMS units log this; it tells you where you are in the battery’s lifespan.
Pro Tip: A smart battery monitor with Bluetooth, such as those compatible with Victron’s ecosystem, lets you check system status from your phone without opening a locker. Real-time data removes guesswork entirely. Review the battery setup guide for configuration tips.
Common pitfalls that shorten battery life:
- Allowing batteries to sit at very low state of charge for extended periods.
- Overloading the inverter beyond its continuous rating.
- Letting lithium cells freeze due to absent or faulty low-temperature protection.
- Ignoring warning indicators on the BMS or monitor display.
- Using undersized cables that cause heat build-up during high-current charging.
Weekly checks take under five minutes: review SoC history, check terminal connections for corrosion, and confirm solar input is registering correctly on the MPPT controller display.
Find trusted lithium, solar and off-grid solutions for your campervan
Sourcing quality components from a specialist supplier makes a measurable difference to system reliability and safety. Cheap, unbranded parts introduce risk at every stage, from fire hazards in poorly fused wiring to premature battery failure.

At Skyenergi, we supply high-performance lithium leisure batteries, MPPT solar controllers, DC-DC chargers, and Victron-compatible monitoring equipment, all sourced directly from manufacturers for competitive pricing. For a complete turnkey solution, the solar power and electrics system includes a 3kVA inverter-charger, battery-to-battery charger, and monitoring in one integrated package. If you are building a solar-first setup, the Victron 610W solar kit pairs a high-output panel with a Victron Smart MPPT controller, cabling, and mounting hardware. Both options are ready for UK campervan installation.
Frequently asked questions
How many days can I run my campervan off-grid with 100Ah lithium batteries?
A 100Ah LiFePO4 provides roughly 1,000Wh usable, which covers moderate daily essentials for 1 to 2 days. Adding solar and DC-DC charging extends this significantly for longer stays.
Is installing lithium batteries in my campervan difficult?
Lithium kits are increasingly user-friendly, but proper wiring and fusing are critical for safety. Professional installation is recommended if you are not confident with 12V auto-electrics.
How do I keep my campervan power system running in winter?
Solar alone is insufficient during short winter days in the UK. Combine DC-DC alternator charging with solar input, and ensure your lithium batteries include low-temperature protection or a built-in heater.
Can AGM still work for occasional or budget campervan use?
AGM suits short, budget trips but lithium outperforms it for frequent, full-time, or heavy off-grid demands where cycle life and usable capacity matter most.
How can I maximise battery lifespan in my campervan?
Avoiding deep discharge and overcharge is the single most effective way to extend battery life. Use a smart monitor to track state of charge and keep lithium cells within the recommended operating range daily.
Recommended
Prev post

Off-grid power solutions checklist for UK leisure vehicles
Updated on 30 March 2026
Next post

Why upgrade campervan electrics for off-grid performance
Updated on 28 March 2026


