


Campervan solar power guide: 200W+ for UK off-grid
Learn how to size and install a campervan solar system with lithium batteries for reliable UK off-grid power. Covers panels, controllers, charging, and safety.
Running out of power mid-trip is one of the most frustrating experiences in campervan life. You’re parked in a stunning Scottish glen or a quiet Cornish lane, miles from the nearest hook-up, and your fridge starts warming up. Traditional setups relying on leisure batteries alone simply can’t sustain modern campervan loads for more than a day or two. A well-designed solar system paired with a lithium battery changes everything, giving you genuine energy independence wherever you park.
Table of Contents
- Assessing your campervan energy needs
- Choosing the right solar panels and charge controllers
- Lithium batteries versus AGM: Which is best?
- Multi-source charging: Maximising UK off-grid reliability
- Monitoring, maintenance and safety for campervan solar systems
- Get expert campervan solar solutions
- Frequently asked questions
Key Takeaways
| Point | Details |
|---|---|
| Solar alone is not enough | UK winters require multi-source charging to maintain reliable campervan power off-grid. |
| Lithium batteries are superior | LiFePO4 batteries deliver more usable capacity, longer lifespan, and better efficiency than AGM. |
| Regulations and safety matter | Follow UK standards for wiring, fuses, and professional installation to prevent risks. |
| Monitoring boosts efficiency | Use Bluetooth-enabled shunts or apps to track your campervan energy and ensure optimal performance. |
Assessing your campervan energy needs
Before buying a single panel or battery, you need to know how much power you actually use each day. This is called your daily energy budget, measured in watt-hours (Wh). Get this wrong and you’ll either overspend on kit you don’t need or find yourself rationing power on day two.
Start by listing every appliance you run and how long you use it. Here’s a quick reference for common campervan loads:
- 12V compressor fridge: 30-60W, running roughly 8-12 hours per day = 240-720Wh
- LED lighting: 10-20W, 4 hours per day = 40-80Wh
- Phone and laptop charging: 20-65W, 2-3 hours per day = 40-195Wh
- 12V water pump: 60W, 15 minutes per day = 15Wh
- Diesel heater fan: 10-25W, 6 hours per day = 60-150Wh
- TV or tablet: 20-40W, 2 hours per day = 40-80Wh
Add those up and most UK campervans land somewhere between 500Wh and 1,200Wh per day. That figure tells you how much storage you need and how many panels to pair with it.
Solar output varies dramatically with the seasons. A 100W panel produces roughly 300-500Wh on a clear summer day in the UK, but only 30-150Wh during a grey December. UK campervan solar systems typically use 200-400W of rigid panels with MPPT controllers, paired with 100-300Ah LiFePO4 lithium batteries for off-grid use. That combination covers most daily budgets in summer and provides a solid base for multi-source charging in winter.
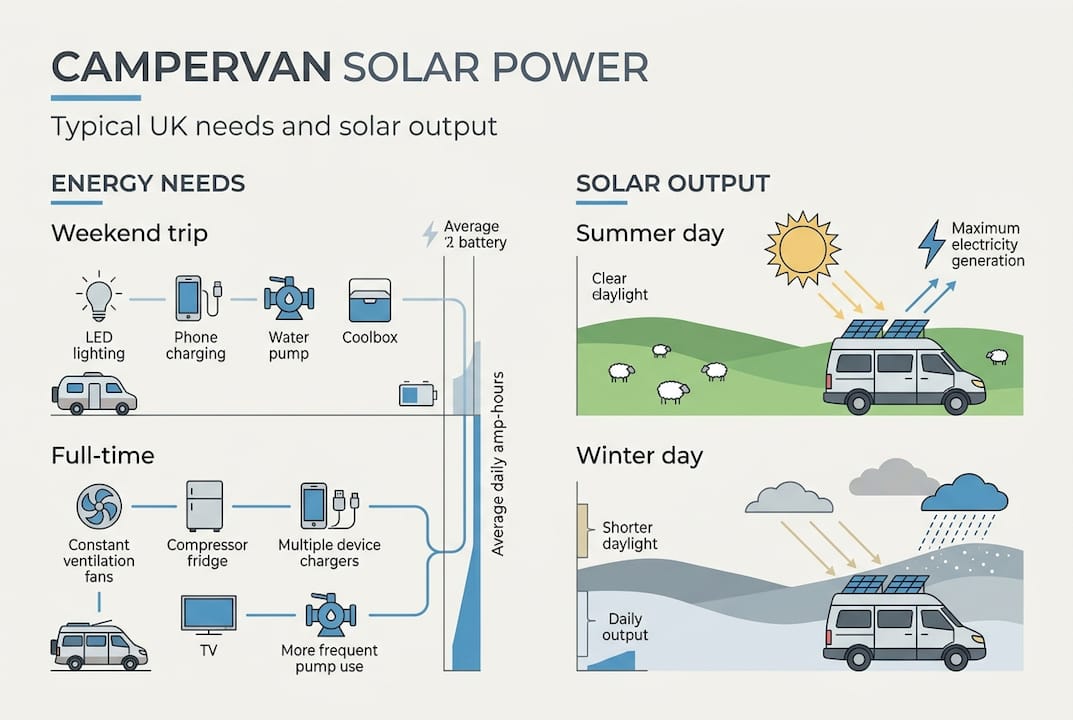
For occasional weekend trips, a 200W panel with a 100Ah lithium battery is often enough. Full-time tourers or those running larger appliances should look at 400W of panels and 200Ah or more of storage. You can explore practical solar charging setups and solar charging tips to see how real-world systems are sized.
| Travel style | Recommended solar | Recommended battery |
|---|---|---|
| Weekend trips | 100-200W | 100Ah LiFePO4 |
| Regular touring | 200-300W | 150-200Ah LiFePO4 |
| Full-time living | 300-400W+ | 200-300Ah LiFePO4 |
Choosing the right solar panels and charge controllers
Once you know your energy needs, the next step is selecting panels and controllers suited to UK regulations and weather conditions. The choice between rigid and flexible panels is often the first decision people face, and it matters more than most realise.
Rigid monocrystalline panels are the most popular choice for UK campervans. They’re more durable, perform better in low-light conditions (which is most of the UK), and typically carry longer warranties. Flexible panels are lighter and can conform to curved roofs, but they run hotter, degrade faster, and generally produce less power per square metre. For a vehicle that will see years of use in British weather, rigid panels are almost always the better investment.
The charge controller sits between your panels and your battery, regulating the voltage and current to protect the battery and maximise charging efficiency. MPPT (Maximum Power Point Tracking) controllers are significantly more efficient than older PWM types, recovering up to 30% more energy from your panels. For any system above 100W, MPPT is the only sensible choice.
UK installations must comply with BS 7671, the national wiring standard. Key requirements include correctly rated fuses on all positive cables, appropriate cable cross-sections for the current carried, and proper weatherproofing for roof penetrations. You can see how compliant systems are built by looking at solar setup examples and following detailed solar setup tips. For the physical wiring process, the battery connection steps guide walks you through each stage.
Pro Tip: Always check that your panel mounting brackets are compatible with your specific roof profile before ordering. A mismatch can mean expensive returns or drilling extra holes you didn’t plan for.
| Panel type | Weight | Output in low light | Lifespan | Best for |
|---|---|---|---|---|
| Rigid monocrystalline | Heavier | Excellent | 25+ years | Most UK campervans |
| Flexible monocrystalline | Light | Good | 10-15 years | Curved roofs, weight-sensitive builds |
| Rigid polycrystalline | Medium | Good | 20-25 years | Budget builds |
Key points to check when selecting your solar panel info and controller:
- MPPT controller rated for your panel’s open-circuit voltage (Voc)
- Fuse on the positive cable within 300mm of the battery
- Cable sized for the maximum current, not just the typical load
- Weatherproof cable entry gland on the roof penetration
Lithium batteries versus AGM: Which is best?
After configuring your panels and controller, it’s vital to choose a battery that matches your planned usage and budget. The two main options are lithium iron phosphate (LiFePO4) and absorbent glass mat (AGM). They look similar from the outside, but they behave very differently.
LiFePO4 lithium batteries offer 80-90% usable capacity, lighter weight, and 2,000+ charge cycles, but require a specialist BMS and are not always drop-in AGM replacements. In practice, a 100Ah lithium battery gives you roughly 90Ah of usable power. A 100Ah AGM gives you about 50Ah before you risk damaging it through deep discharge. That means you’d need twice the AGM capacity to match a lithium battery’s real-world output.
Lifespan is where the maths really shifts. A quality LiFePO4 battery will complete 2,000 to 3,000 cycles before dropping to 80% capacity. A typical AGM manages 300 to 500 cycles. Over ten years of regular use, you might replace an AGM battery three or four times while a lithium battery keeps going. The upfront cost difference shrinks considerably when you factor that in.
Pro Tip: Calculate the cost per usable kilowatt-hour over the battery’s full lifespan, not just the purchase price. Lithium almost always wins on this measure for regular campervan use.
One important caveat: lithium batteries need a Battery Management System (BMS) with low-temperature cut-off protection. Charging a lithium battery below 0°C can cause permanent damage. Not all lithium batteries marketed as leisure batteries include adequate BMS protection, so check the specification carefully. You can compare lithium battery types and understand the solar battery benefits before committing. For a broader comparison of complete systems, the best solar battery systems guide is a useful starting point.
| Feature | LiFePO4 lithium | AGM |
|---|---|---|
| Usable capacity | 80-90% | 45-50% |
| Cycle life | 2,000-3,000+ | 300-500 |
| Weight (100Ah) | ~12-14kg | ~25-30kg |
| Upfront cost | Higher | Lower |
| BMS required | Yes | No |
| Drop-in replacement | Not always | Yes |
Multi-source charging: Maximising UK off-grid reliability
With your panels and battery sorted, integrating multiple charging sources ensures you’re never left without power, especially through UK winters. Solar is brilliant in July. In January, it’s a different story entirely.
Solar output drops by up to 70% in UK winter compared to summer peak production. That’s not a minor dip. It means a 400W system that produces 1,600Wh on a clear August day might only produce 480Wh on a typical January day. For anyone touring through autumn and winter, solar alone simply isn’t enough.
The solution is a balanced multi-source charging setup. Balanced charging combines solar with a 30-50A DC-DC alternator charger and electric hook-up (EHU), with Victron components recommended for seamless integration and monitoring. Here’s how to set it up:
- Install your solar panels and MPPT controller as the primary charging source.
- Add a DC-DC battery-to-battery charger (B2B) to harvest power from your vehicle’s alternator while driving. A 30A unit adds roughly 360Wh per hour of driving.
- Wire in an EHU inlet and mains charger for campsites or driveways where hook-up is available.
- Configure charge profiles on each source to match your battery chemistry. Lithium requires different voltage settings than AGM.
- Connect a battery monitor such as a Victron SmartShunt to track state of charge across all sources in real time.
Safety notice: Complex multi-source systems involve mains voltage and high-current DC circuits. If you’re not confident working with electrical systems, professional installation is strongly recommended to avoid risk of fire, electric shock, or damage to your vehicle.
Victron components are particularly well suited to UK campervan builds because they communicate with each other over a shared data network, allowing you to monitor and control the entire system from a smartphone app. The solar charging workflow tutorial explains how the sources interact, and the solar installation guide covers the physical installation process in detail.
Monitoring, maintenance and safety for campervan solar systems
To ensure your system runs smoothly and safely after installation, monitoring and regular maintenance are essential. A system you can’t see is a system you can’t trust.
A Bluetooth battery shunt such as the Victron SmartShunt connects between your battery negative terminal and the rest of the system, measuring every amp flowing in and out. Paired with the Victron Connect app, it gives you a real-time state of charge, voltage, current, and historical data. Monitoring via Bluetooth shunt is the most reliable way to track system health and catch problems before they become serious.
For routine maintenance, check the following every few months:
- Cable connections: Look for corrosion, loose terminals, or signs of heat damage at connection points.
- BMS alerts: Review any fault codes or warnings logged by your battery management system.
- Charge and discharge logs: Unusual patterns can indicate a failing cell or a parasitic drain.
- Panel surfaces: Clean off bird droppings, moss, or grime that reduce output. Even partial shading from dirt can cut production significantly.
- Fuse condition: Inspect all fuses and replace any that show signs of corrosion or discolouration.
UK safety reminder: All campervan electrical systems must comply with BS 7671 for 230V AC circuits and EN 1648 for 12V leisure vehicle wiring. Fit an RCD (residual current device) and MCB (miniature circuit breaker) on any mains hook-up circuit. Never use undersized cable or omit fusing on DC circuits. For any major upgrade or rewire, use a qualified electrician familiar with leisure vehicle installations.
For guidance on selecting systems with built-in monitoring and safety features, the best solar battery systems guide covers options that make compliance straightforward.
Get expert campervan solar solutions
If you want a stress-free, safe, and expandable solar system for your campervan, professional solutions are available that take the guesswork out of sizing and installation.

At Skyenergi, we supply complete campervan energy packages designed for UK conditions, from compact weekend setups to full-time touring systems. Our solar power electrics system bundles an inverter charger, battery-to-battery charger, and monitoring into a single expandable kit, removing the compatibility headaches that come with sourcing components separately. For those who want the reliability of Victron technology, our Victron solar packages include panels, MPPT controller, cabling, and mounting hardware in one order. We source directly from manufacturers to keep prices competitive without cutting corners on quality.
Frequently asked questions
How much solar power do I need for a UK campervan?
Most UK campervans use 200-400W of solar panels paired with 100-300Ah lithium batteries, though the right size depends on your daily appliance use and whether you tour year-round or just in summer.
Why are lithium batteries better for campervan solar setups?
LiFePO4 batteries deliver 80-90% usable capacity versus around 50% for AGM, last 2,000+ cycles, and weigh significantly less, making them the more cost-effective choice over the lifetime of a campervan build despite the higher upfront price.
Can solar panels alone power my campervan all year in the UK?
No. UK winter solar output can fall by up to 70% compared to summer, so combining solar with alternator charging via a DC-DC charger and electric hook-up is essential for reliable year-round power.
Do I need professional installation for a campervan solar system?
For simple single-source setups, a competent DIYer can manage the work, but complex multi-source systems involving mains voltage or significant rewiring should always be handled by a qualified electrician to ensure safety and compliance with UK wiring regulations.
Recommended
Prev post

Why upgrade campervan electrics for off-grid performance
Updated on 28 March 2026
Next post

What is a leisure battery? Your complete campervan guide
Updated on 26 March 2026


