


Step-by-step solar panel setup for UK campervans: 2026 guide
Learn how to plan, install, and test a solar panel setup for your UK campervan. Covers panel sizing, lithium batteries, MPPT controllers, wiring, and real-world UK yield expectations.
TL;DR:
- A well-designed UK campervan solar system can reduce reliance on hook-ups and improve off-grid independence.
- Use durable monocrystalline panels, lithium batteries, and MPPT controllers rated for future expansion.
- Proper roof preparation, wiring, and safety compliance are critical for a reliable and safe installation.
Running out of power on a remote Scottish hillside or a quiet Welsh lane is a frustrating reality for many UK campervan owners. Unreliable 12V electrics, flat leisure batteries by morning, and the constant hunt for hook-up pitches are problems that a well-planned solar setup can largely eliminate. This guide covers every key stage: calculating your power needs, selecting the right components, preparing your roof, wiring safely, and testing for real-world UK performance. The advice here is specific to British conditions, regulations, and typical van usage patterns, not generic solar theory.
Table of Contents
- Assessing your power needs and planning the setup
- Choosing the right components: Panels, batteries, and controllers
- Preparation: Tools, materials and roof readiness
- Step-by-step installation: Mounting, wiring, and electrics
- Testing, monitoring, and real-world expectations
- Expert truths: What most guides miss about van solar setups
- Your next step: Off-grid power solutions designed for you
- Frequently asked questions
Key Takeaways
| Point | Details |
|---|---|
| Plan based on usage | Accurately calculate your daily power demand and roof space before purchasing any components. |
| Choose efficient kit | Rigid monocrystalline panels, lithium batteries, and MPPT charge controllers perform best for the UK climate. |
| Prioritise safe install | Thorough preparation, clean roof, correct adhesives, and fusing all electrical positives prevent costly mistakes. |
| Monitor and adapt | Regularly test and monitor your solar setup with reliable apps and keep backup charging options in winter. |
| Compliance is critical | Always follow UK electrical safety standards to protect your van, yourself, and your insurance. |
Assessing your power needs and planning the setup
Before buying a single panel, map your daily energy consumption. List every appliance you run and estimate its daily usage in watt-hours (Wh). A 12V compressor fridge is typically the biggest draw, consuming 300 to 500Wh per day depending on ambient temperature. Add lighting (LED strips at roughly 20Wh), a phone and laptop charger (50 to 100Wh combined), a diesel heater fan (30 to 60Wh), and a water pump (10 to 20Wh). Your realistic daily total for a modest setup is usually 500 to 900Wh.
UK sunlight hours vary significantly. Summer in southern England can deliver five to six peak sun hours per day; Scotland in January may offer fewer than one. This matters enormously when sizing your system. Explore solar power requirements in the UK to understand seasonal yield differences before committing to a panel size.
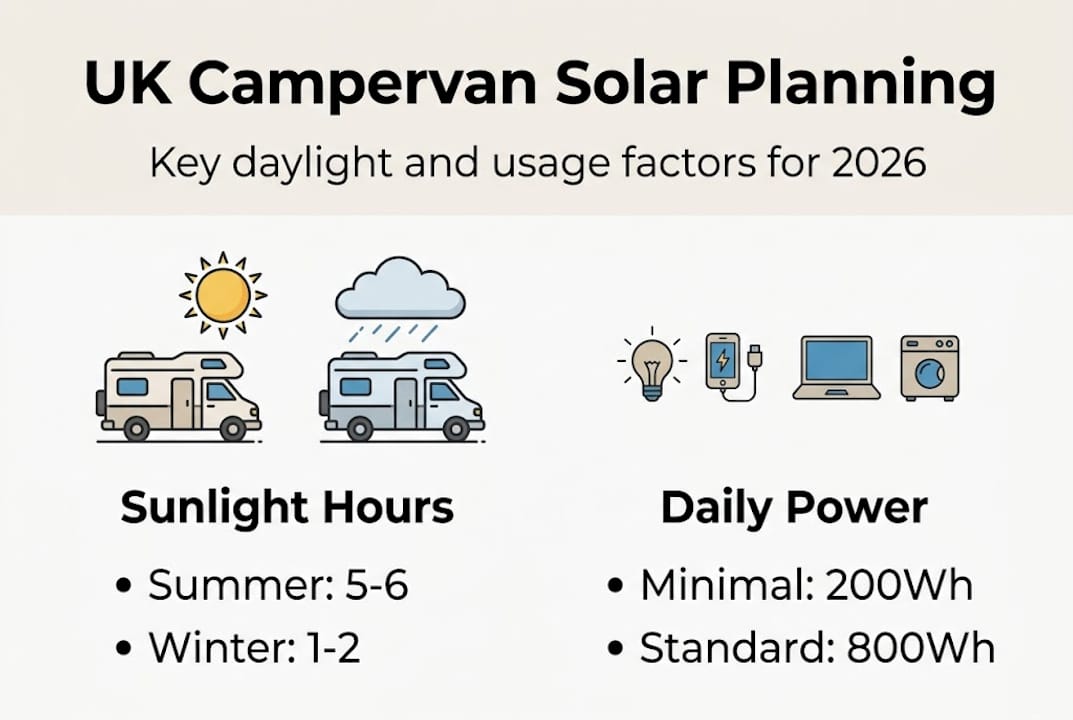
Measure your available roof area carefully. Account for roof vents, skylights, and any raised roof sections that create shading. A standard panel-sizing recommendation for UK vans is 200 to 400W, with panel sizing advice suggesting 300W as a practical starting point for four-season use.
| Daily usage scenario | Estimated Wh/day | Recommended panel size |
|---|---|---|
| Minimal (lighting, phone) | 150 to 300Wh | 100 to 200W |
| Moderate (fridge, lighting, devices) | 500 to 700Wh | 200 to 300W |
| Heavy (fridge, heating fan, laptop) | 800 to 1000Wh | 300 to 400W |
For solar charging setup examples that match different van types, reviewing real-world configurations is useful before finalising your plan.
Pro Tip: Always overestimate your energy needs by at least 20% for UK conditions. Cloud cover, partial shading, and winter months all reduce real-world output below theoretical maximums.
Choosing the right components: Panels, batteries, and controllers
With your requirements mapped out, it is crucial to pick components optimised for UK conditions and your specific needs.
For panels, rigid monocrystalline units are the practical choice for UK campervans. They offer higher efficiency in low-light conditions, better durability over time, and longer warranties than flexible alternatives. Flexible panels are lighter and suit curved roofs, but they degrade faster and trap heat, reducing efficiency. Rigid monocrystalline panels offer superior durability and perform better in the diffuse light typical of British skies.
For batteries, lithium iron phosphate (LiFePO4) is the clear upgrade over AGM. Lithium batteries deliver 80 to 90% usable capacity, weigh significantly less, and tolerate more charge cycles. AGM batteries are cheaper upfront but offer only 50% usable capacity and degrade faster with repeated deep discharges. For a full comparison, see solar battery systems comparison.
MPPT charge controllers are essential. They extract significantly more power from your panels than PWM (pulse-width modulation) alternatives, with Victron MPPT controllers increasing yield by 15 to 30% in the UK compared to basic PWM units. Victron’s SmartSolar range also integrates with Bluetooth monitoring apps. For more on solar energy storage options, including battery management systems, the Skyenergi blog covers the topic in detail.
Core component checklist:
- Monocrystalline solar panel(s)
- Victron MPPT charge controller
- LiFePO4 leisure battery
- Fused positive cables (10mm minimum)
- Weatherproof cable glands
- Mounting brackets and hardware
- Battery monitoring shunt or display
Pro Tip: Size your charge controller for future expansion. If you plan to add a second panel later, buy a controller rated for double your current panel wattage now.
Preparation: Tools, materials and roof readiness
Once you have selected your kit, preparation is key for a safe and lasting installation.
Start by gathering all required tools and materials before touching the vehicle. Working methodically reduces errors and avoids mid-install trips to a trade supplier.
| Required item | Purpose |
|—|—|
| Drill and step bits | Cable entry holes |
| Jigsaw or angle grinder | Bracket slots if needed |
| Sikaflex 522 or equivalent | Weatherproof bonding and sealing |
| Cable glands (IP67 rated) | Watertight roof penetrations |
| Self-amalgamating tape | Additional cable protection |
| Multimeter | Continuity and voltage checks |
| Cable ties and conduit | Neat, protected cable runs |
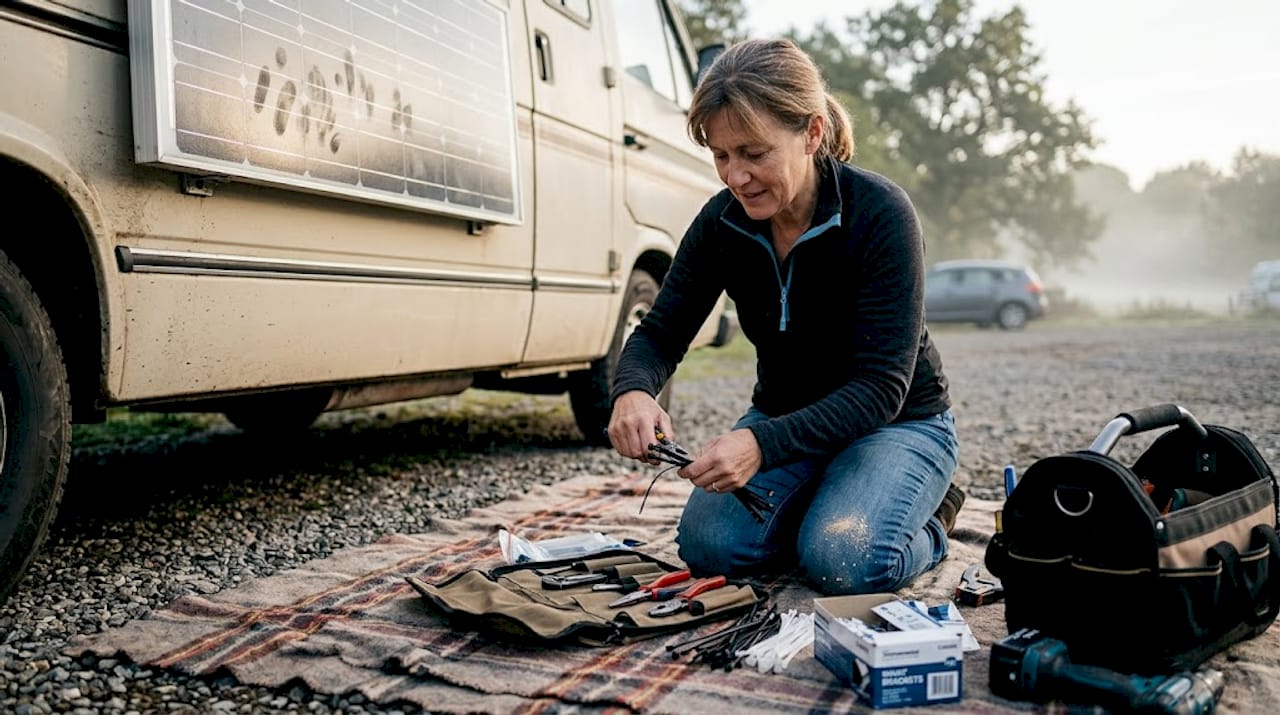
Roof preparation is critical. Clean the mounting area thoroughly with a degreaser, removing all wax, grease, and oxidation. Trial-fit your brackets before applying any sealant. Use Sikaflex sealant, allow full cure time, and avoid creating new penetrations where existing holes or vents can be used for cable routing.
Key preparation steps:
- Mark bracket positions with a pencil or masking tape
- Check for hidden wiring or structural ribs beneath the roof skin before drilling
- Dry-fit all components on the roof before committing to adhesive
- Plan cable routes from roof entry to battery, avoiding heat sources and sharp edges
Safety note: Never drill into a roof section without confirming what lies beneath. Many van roofs conceal wiring looms, insulation, and structural bracing. Use a borescope camera or consult vehicle-specific forums before cutting.
For a detailed off-grid solar installation guide covering vehicle-specific preparation steps, the Skyenergi resource library is a useful reference. For complex builds, Victron off-grid systems documentation provides additional wiring guidance.
Step-by-step installation: Mounting, wiring, and electrics
With roof and materials ready, it is time to walk through the core installation process.
- Assemble brackets off the van. Attach mounting feet to panels on the ground. This is safer and easier than working at height.
- Apply sealant and bond brackets. Apply Sikaflex to bracket bases, press firmly onto cleaned roof positions, and allow 48 hours to cure before loading with panel weight.
- Install cable glands. Fit IP67-rated cable glands at roof entry points. Route positive and negative cables separately where possible, and mark polarity clearly with tape or heat-shrink labels.
- Route cables internally. Run cables through the van’s interior to the charge controller location, keeping them away from sharp edges, heat sources, and moving parts. Use conduit or trunking for protection.
- Connect the MPPT controller. Mount the controller near the battery. Connect battery terminals first, then panel cables. Use 10mm cable for runs up to five metres; increase to 16mm for longer runs.
- Fuse all positive cables. Place an inline fuse as close to the battery positive terminal as possible. Fuse every positive connection; this is non-negotiable for fire safety and BS7671 compliance.
- Connect the battery. Negative first when connecting, positive first when disconnecting. Confirm polarity before closing any circuit.
For a complete solar charging workflow tutorial and battery connection steps specific to UK campervans, Skyenergi’s guides cover both in detail. Compliance with installation safety standards including BS7671 is essential for insurance validity.
Pro Tip: Leave 150 to 200mm of slack in all cable runs near the roof entry and controller. Vibration during transit will stress tight connections over time, leading to intermittent faults.
Testing, monitoring, and real-world expectations
Installation complete, it is time to verify your system delivers safe, dependable power and set realistic performance expectations.
After connecting everything, use a multimeter to confirm voltage at the controller input (panel voltage) and output (battery charging voltage). A healthy 12V lithium battery should show 13.2 to 14.6V during active charging. Check that the MPPT controller display or app shows watts being harvested from the panels.
VictronConnect app monitoring gives live data on solar input, battery state of charge, and historical yield. This is genuinely useful for diagnosing shading issues or connection faults.
Realistic UK yield benchmarks:
| Season | Expected yield per 100W panel |
|---|---|
| Summer (south England) | 300 to 400Wh/day |
| Spring/autumn | 150 to 250Wh/day |
| Winter (UK average) | 30 to 150Wh/day |
Shading from roof bars, trees, or adjacent vehicles can halve output. Even partial shading of one cell in a series-wired panel string significantly reduces total yield. For solar charging tips on maximising winter performance, parallel wiring and bypass diodes are worth understanding.
Solar works best combined with alternator DC-DC charging for travel days and EHU (electric hook-up) on sites during winter. For a full breakdown of energy storage for campervans, including hybrid charging strategies, see Skyenergi’s dedicated guide. Off-grid power performance in winter is covered in depth at off-grid power performance.
Pro Tip: Clean panels every two to three weeks on the road and inspect all roof fixings after any long motorway journey. Vibration loosens sealant and mounting hardware faster than most owners expect.
Expert truths: What most guides miss about van solar setups
Most installation guides stop at the how-to. Here is what experienced installers and long-term vanlifers actually learn.
Solar alone is not a viable year-round off-grid strategy in the UK. Real-world solar limitations in winter are severe. A 300W system producing 90Wh on a grey January day will not power a fridge overnight. A DC-DC charger paired with your alternator is not optional in winter; it is the backbone of the system.
Shading is more destructive than most guides acknowledge. Panels wired in parallel lose only the output of the shaded panel. Panels wired in series lose output proportional to the worst-performing cell in the string. For roofs with partial shading risk, parallel wiring is the better choice, even if it requires heavier cable.
Compliance is routinely glossed over. BS7671 and EN1648 are not bureaucratic formalities. They are the standards your insurer will reference if there is an electrical fire. Every positive fused, every connection properly rated, every cable correctly sized. Cutting corners here creates real risk.
Finally, quality monitoring is not a premium add-on. Knowing your battery state of charge accurately, in real time, is what separates confident off-grid travel from anxious guesswork. Invest in a proper shunt-based monitor or a Victron BMV unit from the start.
Your next step: Off-grid power solutions designed for you
If you would rather skip the DIY process or want the confidence of a professionally specified system, Skyenergi has ready-to-fit solutions built for UK campervans and motorhomes.

The Victron 610W solar kit includes panels, a SmartSolar MPPT controller, cabling, mounting hardware, and a battery option, removing the component-selection guesswork entirely. For a complete electrical system, the full solar power electrics systems package covers inverter-charger, DC-DC charging, monitoring, and battery in a single, pre-engineered solution. Both are sourced directly from manufacturers and designed for straightforward installation in standard UK leisure vehicles.
Frequently asked questions
How much solar power do I need for my UK campervan setup?
Most UK vans need 200 to 400W of solar panels paired with 100 to 300Ah of LiFePO4 battery capacity to power essentials off-grid for several days in reasonable weather.
Should I choose lithium or AGM batteries for van solar?
Lithium batteries offer 80 to 90% usable capacity and significantly lower weight, making them the preferred choice for most UK solar setups compared to AGM alternatives.
Can I run off-grid all year with just solar in the UK?
No. UK winters require backup via alternator DC-DC charging or electric hook-up, as solar output alone is typically insufficient from October through to March.
Is professional installation necessary for van solar?
DIY installation is achievable, but BS7671 and EN1648 compliance is required for insurance validity and fire safety. Correct fusing and cable sizing are non-negotiable.
How do I monitor my campervan’s solar system?
Use an MPPT controller with Bluetooth app support such as VictronConnect to view live solar input, battery state of charge, and historical yield data.
Recommended
Prev post

Why choose off-grid power: Energy independence for UK leisure vehicles
Updated on 15 April 2026
Next post

Off-grid energy trends for UK leisure vehicles: 2026 guide
Updated on 13 April 2026


