


How to Troubleshoot Common 12V Electrical Issues in Motorhomes
12V electrical issues motorhomes commonly experience stem from flat leisure batteries, corroded terminals, blown fuses, or loose wiring connections.
Last Updated: October 24, 2026
Quick Summary
12V electrical issues motorhomes commonly experience stem from flat leisure batteries, corroded terminals, blown fuses, or loose wiring connections. Start troubleshooting by checking your battery voltage with a multimeter, inspecting terminals for corrosion, and testing fuses before investigating chargers and ground connections.
- A healthy leisure battery reads between 12.6V and 13.2V when fully charged and disconnected from any charger.
- Always disconnect the negative battery terminal first before working on any 12V electrical system to prevent accidental short circuits.
- A blown fuse has a broken or blackened wire inside, while a good fuse shows an intact shiny wire when held to light.
- Parasitic drain below 50mA is acceptable, but above 100mA indicates a problem requiring circuit investigation.
- Install a battery monitor like the Victron Energy SmartShunt 300A for real-time tracking of charge, voltage, and current draw.
Table of Contents
- Safety First: Essential Precautions Before Testing Your 12V System
- Step 1: Check Your Leisure Battery Charge and Voltage
- Step 2: Inspect Battery Terminals and Connections
- Step 3: Diagnose Motorhome 12V Fuse Problems
- Step 4: Test Wiring, Connectors and Ground Connections
- Why Your Motorhome Leisure Battery Not Charging
- Why Your Motorhome Solar Panel Not Charging Battery
- Fixing a Motorhome Battery Keeps Going Flat
- Frequently Asked Questions
Safety First: Essential Precautions Before Testing Your 12V System
Before you touch anything in your motorhome's 12V electrical system, stop and think about safety when addressing 12V electrical issues motorhomes commonly face.
Always disconnect the negative terminal of your leisure battery first. This cuts the power to the entire system and prevents accidental short circuits.
Work in a well-ventilated area. Never smoke near the battery or use open flames. If you smell burning plastic or see smoke, stop immediately and call a professional electrician.
Use a multimeter to test voltage safely. This tool lets you measure electrical current without touching live wires directly.
Step 1: Check Your Leisure Battery Charge and Voltage
A flat or weak leisure battery is the most common reason for 12V electrical failures in motorhomes. Before you investigate further, confirm that your battery actually has a charge.
Reading voltage with a multimeter
A healthy leisure battery should read between 12.6V and 13.2V when fully charged and disconnected from any charger. Below 12V, the battery is dangerously low. Below 11V, it's essentially flat.
Set your multimeter to DC voltage mode. Touch the red probe to the positive terminal and the black probe to the negative terminal. Hold them steady for a few seconds and read the display.
If the reading is below 12V, your battery needs charging before you continue troubleshooting. A flat battery can mask other electrical problems.
Using a battery monitoring system
A battery monitor like the Victron Energy SmartShunt 300A gives you real-time information about your battery's state of charge, voltage, and current draw. Unlike a one-off multimeter reading, it tracks your battery continuously.

The SmartShunt connects to your battery and displays data via Bluetooth on your phone. You can see exactly how much energy you have left, how fast you're draining it, and whether your chargers are working.
If you don't have a monitor yet, install one. It's the single best tool for understanding your 12V system.
Step 2: Inspect Battery Terminals and Connections
Corroded or loose battery terminals stop power from flowing properly. Even a small layer of corrosion creates resistance, which means less power reaches your appliances.
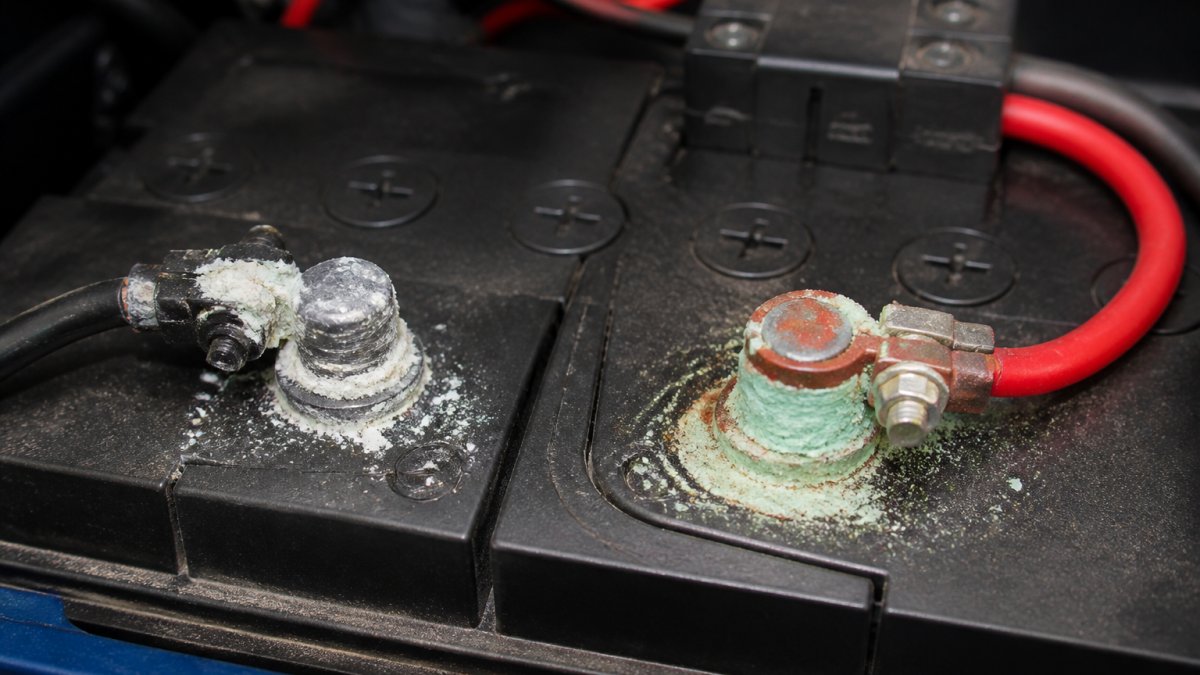
Look at both the positive (red) and negative (black) terminals. Corrosion appears as white, green, or blue powder or crust on the metal.
Clean corroded terminals with a wire brush or fine steel wool. Remove the negative terminal first, then the positive.
Tighten the terminal clamps. Use a spanner to ensure they're snug but not over-tightened.
Check the cable itself. Look for cuts, burns, or discoloration along the wire. Damaged cables must be replaced.
Step 3: Diagnose Motorhome 12V Fuse Problems
Blown fuses are your system's safety mechanism. When too much current flows through a circuit, the fuse melts and breaks the connection. This prevents fire and damage to equipment.
Locating your fuse box
Your motorhome has at least one fuse box, usually mounted near the leisure battery or under a cupboard. Some motorhomes have multiple boxes. Check your owner's manual for the exact location. If you can't find it, look for a plastic box with a transparent or opaque cover.
Open the cover carefully. Inside, you'll see rows of small plastic fuses, usually colour-coded. Each fuse protects a different circuit: lights, fridge, water pump, habitation charger, and so on.
Identifying a blown fuse
A blown fuse looks different from a good one. Pull each fuse out gently and hold it up to the light. A good fuse has a thin wire visible inside the clear plastic casing. The wire is intact and shiny.
A blown fuse has a broken or blackened wire. You'll see a gap where the wire snapped, or the inside will look charred.
If you find a blown fuse, replace it with a new one of the same amperage. The number is printed on the fuse body. Never use a higher-rated fuse, it won't protect your circuits.
Replacing fuses safely
Before you replace a fuse, disconnect the negative battery terminal. This ensures no power flows while you work.
Remove the blown fuse and insert a new one of the correct rating. Push it in firmly until it clicks into place.
If the new fuse blows immediately, stop. This means there's a deeper fault, either a short circuit or an overloaded circuit.
For a safer, more organised fuse setup, install a dedicated fuse box like the Skyenergi ST Blade Fuse Block with 12 Circuits at £24.95.

Common fuse issues follow predictable patterns that you can identify and fix quickly.
| Problem | Cause | Fix |
|---|---|---|
| Blown fuse | Too much current in circuit | Replace with same amperage fuse |
| Fuse blows immediately after replacement | Short circuit or overloaded circuit | Stop and investigate deeper fault |
| Broken or blackened wire inside fuse | Circuit overload or fault | Replace fuse, check circuit capacity |
| Loose fuse in socket | Fuse worn or incorrect type | Replace with correct rating fuse |
Step 4: Test Wiring, Connectors and Ground Connections
Loose wires and corroded connectors break the power supply to individual circuits. A single loose connection can stop an entire appliance from working.
Skyenergi ST Blade Fuse Block - 12 Circuits with Cover - 5026 →
Trace the wiring from your battery to each appliance. Look for loose connectors, they should not move when you gently pull them.
Inspect the wires themselves for damage. Look for cuts, burns, or melted insulation.
Check your ground connections. Every 12V circuit needs a return path to the negative terminal of the battery.
Trace the black (negative) wires from your appliances back to the battery. Ensure every connection is tight and clean.
Why Your Motorhome Leisure Battery Not Charging
If your battery voltage stays low even when you're driving or plugged into shore power, your charging system isn't working. This is a serious problem because your battery will eventually run flat.
Check your charging sources
Your motorhome has multiple ways to charge the leisure battery:
- Alternator charging: When you drive, the engine's alternator generates power. This charges the battery through a DC-to-DC charger or a direct connection.
- Shore power: When you're plugged into a campsite, the habitation charger converts mains power to 12V and charges the battery.
- Solar panels: If you have solar, they charge the battery via an MPPT controller.
Check which chargers are active. If you're driving but the battery isn't charging, the alternator circuit has a fault. If you're plugged in but not charging, the habitation charger has failed. If solar panels aren't working, the controller or panels are faulty.
Test the alternator and DC-to-DC charger
Start the engine and measure the battery voltage with a multimeter. It should rise above 13.2V within a few seconds. If it stays at 12V or below, the alternator isn't charging.
Check the DC-to-DC charger. This device sits between the engine battery and the leisure battery. It converts the variable voltage from the alternator into stable 12V for charging. Look for the charger under a seat or in a cupboard.
If the charger's indicator light is off, it's not powered. If it's red, it's in fault mode. Consult the manual for what each light means.
For a more detailed diagnosis, read MPPT vs DC-to-DC Chargers: Which Suits Your Motorhome to understand which charging method suits your setup. You may also find How to Troubleshoot DC to DC Charger Voltage Drops helpful if the charger is working but delivering weak power.
Why Your Motorhome Solar Panel Not Charging Battery
Solar panels should charge your battery during daylight hours. If they're not, the fault is either the panels themselves, the wiring, or the MPPT controller.
First, check the solar panel output. On a clear day, a panel should produce voltage. Use your multimeter to measure the voltage at the panel terminals.
Next, trace the wiring from the panel to the MPPT controller. Look for loose connectors, cuts, or corrosion. Any break in the wiring stops power flow.
Check the MPPT controller. Explore a complete solar charging system with MPPT controller to resolve solar panel charging issues.
A complete solar charging system like the Victron 175W Mono Solar Panel Kit with SmartSolar MPPT 75/15 includes quality panels and a proven controller, eliminating compatibility issues and simplifying troubleshooting.
Fixing a Motorhome Battery Keeps Going Flat
If your battery drains quickly even when you're not using anything, two things are happening: parasitic drain or overloaded circuits.
Identifying parasitic drain
Parasitic drain is power consumption when the motorhome is off. Your fridge, water heater, control panels, and other devices draw small amounts of power even in standby mode. Over days or weeks, this drains the battery flat.
To measure parasitic drain, disconnect the negative battery terminal and insert a multimeter between the terminal and the battery. Set it to measure current (amps). Read the display. Drain below 50mA is acceptable. Above 100mA, you have a problem.
Identify which circuit is draining power by disconnecting each fuse one at a time. When the drain drops, you've found the culprit.
Testing for overloaded circuits
An overloaded circuit draws too much current for the fuse to handle safely.
Check how many amps each appliance draws. This is usually printed on the device. Add up the total.
The solution is to spread appliances across multiple circuits or upgrade to higher-capacity fuses and wiring.
For better circuit protection and organisation, consider the Skyenergi Bx2054 Multi Circuit Fuse Box with 4 Outputs.
Troubleshooting 12V electrical issues motorhomes experience takes patience and a systematic approach. Start with the basics, battery voltage, terminals, and fuses, before investigating chargers and wiring.
Frequently Asked Questions
How do I check whether a motorhome leisure battery is charging?
Use a multimeter set to DC voltage mode and connect the red probe to the positive terminal and black probe to the negative terminal. A healthy 12V system should read between 13.5V and 14.4V when the engine is running or a charger is connected. If the reading stays at 12V or below, your battery is not charging. A battery monitoring system like the Victron SmartShunt 300A provides real-time charging data via Bluetooth, making it easier to track charge levels without manual testing.
Why does my motorhome leisure battery keep going flat?
A battery that drains quickly despite being fully charged typically indicates parasitic drain (devices drawing power when the system is off), an overloaded circuit, or a failing battery. Check for loose wiring or corroded connections that reduce charging efficiency. If all connections are clean and tight, the issue may be a worn-out leisure battery or a faulty charging system. The Victron Smart BatteryProtect 12/24V 100A can help prevent complete discharge by disconnecting non-essential loads before the battery is fully depleted, protecting it from damage.
Can a faulty fuse stop all the 12V electrics in a motorhome?
A single blown fuse typically affects only the circuit it protects, not the entire 12V system. However, if the main fuse or a high-capacity fuse controlling multiple circuits fails, it can cut power to several appliances at once. Always check your fuse box for blown fuses first, they appear discoloured or have a broken wire inside. The Skyenergi ST Blade Fuse Block with 12 circuits and integrated negative busbar makes it easy to identify which fuse controls which circuit and simplifies replacements during troubleshooting.
What should I do if my motorhome 12V system still isn't working after I've checked the battery, fuses and connections?
If voltage readings are normal, fuses are intact, and connections are clean but appliances still won't work, the fault may involve damaged wiring inside the walls, a failed inverter, a tripped circuit breaker, or a faulty appliance itself. Test individual 12V circuits with a multimeter to isolate the problem. If you detect no voltage in a circuit despite the fuse being good, stop troubleshooting, this indicates internal wiring damage or a component failure that requires professional diagnosis to avoid safety risks.

Prev post

Are Campervan Battery Isolators Worth It?
Updated on 26 October 2026
Next post

Best Portable Solar Panels for Campervans: 2026 Review
Updated on 24 October 2026


