






How to Install a Lithium Campervan Battery: 2026 Guide
Learn how to install a lithium campervan battery safely. Step-by-step guide covering wiring, fusing, charging profiles and DC-to-DC setup. Start.
Table of Contents
- What You'll Need Before You Start
- Step 1: Check Compatibility With Your Existing Electrical System
- Step 2: Remove the Old Lead-Acid Battery and Prepare the Space
- Step 3: Mount and Secure Your Lithium Campervan Battery
- Step 4: Leisure Battery Fuse Sizing and Cable Connections
- Step 5: DC-to-DC Charger Installation for Alternator Charging
- Step 6: Setting the Correct Lithium Battery Charging Profile
- Common Mistakes to Avoid When Installing a Lithium Campervan Battery
- Frequently Asked Questions
Last Updated: September 14, 2026
What You'll Need Before You Start
A standard 100Ah lead-acid battery weighs roughly 25kg, according to RoamWorthy's lithium conversion analysis, and that weight sits high and forward in most van builds. Swapping to lithium cuts that mass by more than half while roughly doubling usable capacity. Skyenergi supplies the batteries, chargers and distribution kit for exactly this upgrade, so this guide walks through the full installation sequence we see most often in UK conversions.
Before you touch a terminal, gather:
- Torque wrench and insulated spanners
- Multimeter and clamp meter
- Crimping tool with correct terminal lugs
- Cable cutters and heat-shrink
- Class T or MEGA fuse and holder
- DC-to-DC charger, MPPT charge controller and battery monitor
- Fire-rated barrier board if the battery sits behind a wall
Step 1: Check Compatibility With Your Existing Electrical System
Compatibility is the first thing to verify, because upgrading to lithium is rarely a straight drop-in replacement. Current 2026 guidance from RV Travel's lithium upgrade review confirms you need to assess the existing setup, remove old components and often relocate the battery bank to suit the new configuration.
Work through this checklist:
- Confirm your alternator output and whether a smart alternator needs a DC-to-DC charger
- Check your solar charge controller supports a lithium profile (most PWM units do not)
- Verify your inverter's low-voltage cutoff is adjustable above 11V
- Inspect existing cable gauge against the new current draw
- Confirm your split charge relay or battery isolator will be bypassed or replaced
If your charger has no lithium setting, it will undercharge the battery and shorten cycle life. Replace it rather than work around it.
Step 2: Remove the Old Lead-Acid Battery and Prepare the Space
Disconnect the negative terminal first, then the positive, and remove the old battery. Lead-acid units of the size you are replacing typically weigh around 25kg, so get help lifting it out rather than straining your back over a wheel arch.
Once it is out, inspect the tray for corrosion and treat any rust before mounting anything new. Clean the area, check for sharp edges that could chafe cable, and confirm your chosen lithium unit fits the footprint. Skyenergi's Edge range starts with the Skyenergi Edge 100Ah Lithium Leisure Battery at £219.00, which suits tight spaces where a larger bank will not fit.

Step 3: Mount and Secure Your Lithium Campervan Battery
Secure mounting matters more with lithium than lead-acid, because the cells are sensitive to vibration and impact. For multi-battery setups, RELiON's storage guidance recommends custom racks or brackets that allow vertical stacking or secure side-mounting to make best use of the space inside the chassis.
Mount the battery so it cannot shift under braking. Use the manufacturer's fixing points, torque the bolts to spec, and keep the terminals clear of any metalwork. If you are running two batteries in parallel, match them by capacity and age, and keep cable lengths equal so the load splits evenly.
Weight distribution is the angle most guides skip. Moving 25kg of lead-acid out and putting a lighter lithium bank in the same spot changes your rear axle loading, which is worth checking against your van's plated weights.
Step 4: Leisure Battery Fuse Sizing and Cable Connections
Leisure battery fuse sizing should be based on the cable's current-carrying capacity, not the battery's maximum output. Fit the main fuse as close to the battery positive terminal as practical, then size everything downstream to match.
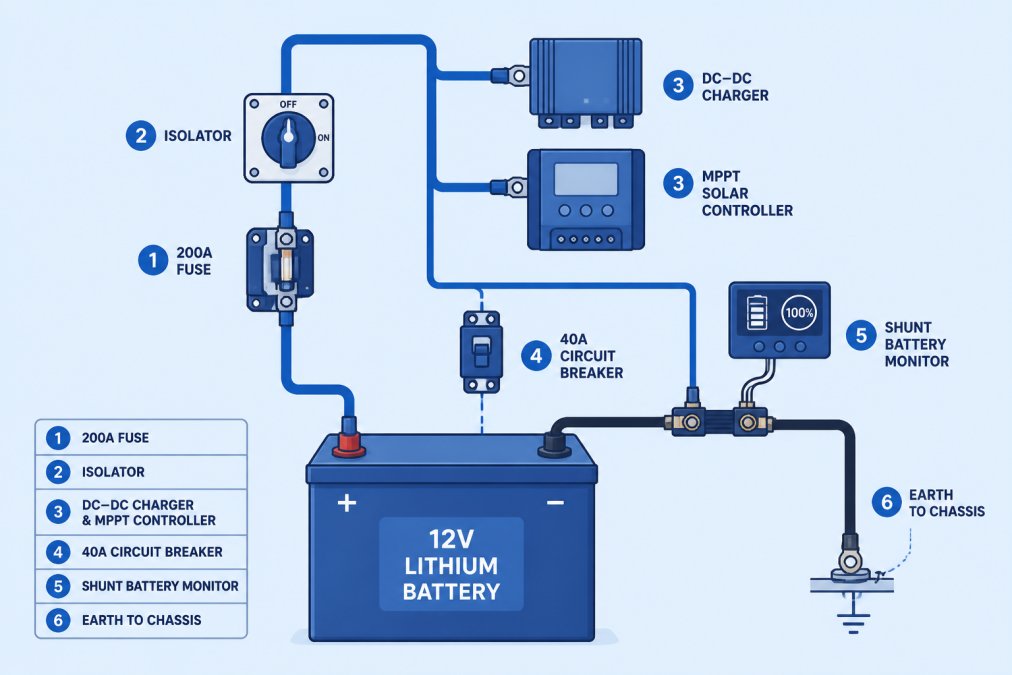
A workable sequence for a typical build:
- Battery positive to main fuse (sized to cable, commonly 150-250A)
- Fuse to battery isolator or master switch
- Isolator to DC-to-DC charger and solar charge controller feeds
- Negative terminal to a shunt-based battery monitor, then to chassis earth
Use correct terminal lugs, crimp them properly, and heat-shrink every joint. Ground the negative to the vehicle chassis via a dedicated earth cable, which is standard safety procedure for lithium leisure battery installation.

Step 5: DC-to-DC Charger Installation for Alternator Charging
DC-to-DC charger installation is what protects your alternator and gives the lithium battery a proper charge profile while driving. A lithium bank will pull far more current than a lead-acid one, and without a DC-to-DC unit that can overload a standard alternator.
Mount the charger close to the battery to keep cable runs short. Wire the input from the starter battery via a fused feed, and the output to the leisure battery through the main fuse. Set the charger's output current to a level your alternator can sustain, and configure the lithium profile rather than leaving it on a generic setting.

If you also run solar, connect the MPPT charge controller output to the same busbar so both sources charge the bank together. Skyenergi's SRNE charging and monitoring systems handle this multi-source setup, and the Skyenergi Elite 304Ah Smart Lithium Leisure Battery - Victron Can-Bus at £745.00 integrates directly with Victron systems for coordinated charging.
Integrating Solar Charge Controllers with Your DC-to-DC System
Most guides treat solar and alternator charging as separate systems, but they must work together to avoid overcharging and to maximise harvest. The key is to set the solar MPPT charge controller to a slightly lower absorption voltage than the DC-to-DC charger, so that when the engine is running, the alternator takes priority. A common pattern is to set the MPPT to 14.2V and the DC-to-DC to 14.4V.
SRNE's MPPT controllers include a lithium profile with adjustable absorption and float voltages, and they can be paralleled with a DC-to-DC charger on the same busbar. Use a battery monitor with a shunt to track net current, if you see the battery voltage climbing above 14.6V, one of your charge sources is set too high.
Sizing the DC-to-DC Charger for Your Alternator
A 12V alternator typically produces 70-150A, but only a fraction is available for leisure charging after the vehicle's own loads. As a rule of thumb, do not exceed 50% of the alternator's rated output for your DC-to-DC charger. For a 100A alternator, a 30-50A charger is safe. If you have a smart alternator (common in Euro 6 vans), you must use a DC-to-DC charger with a smart alternator compatible input, or the alternator will reduce voltage and your leisure battery will not charge. Properly sizing these components ensures the electrical system remains reliable throughout the complex integration required for custom van builds.
Skyenergi's SRNE charging and monitoring systems include a dedicated lithium profile. Wire the ignition signal wire so the charger only operates when the engine is running, preventing accidental discharge of the starter battery.
Step 6: Setting the Correct Lithium Battery Charging Profile
The lithium battery charging profile is the single setting that most affects how long your battery lasts. Get it wrong and you will either undercharge the bank or hold it at a voltage that accelerates degradation. Most practitioners find that the BMS and charger must be configured as a coordinated pair, not independently.
According to Morgans Cloud's buyers guide, selecting the correct Battery Management System is the most critical task when configuring a lithium system for reliable power. Beyond the BMS, set your charger as follows:
- Bulk charge: charge at the battery's rated current until the absorption voltage is reached
- Absorption phase: hold at the manufacturer's specified voltage (commonly 14.2-14.6V for 12V lithium)
- Float voltage: drop to around 13.5V to avoid holding the cells at full charge
- Low-voltage cutoff: disconnect loads before the BMS intervenes
Most modern lithium batteries let you monitor state of charge and cell balance via a phone app. The Skyenergi Edge 280Ah Lithium Leisure Battery at £445.00 pairs a 280A JBD BMS with app-based monitoring, and LithiumHub's technology overview notes that real-time data visibility is now a standard expectation in leisure battery setups.
| Setting | Typical 12V Lithium Value | Why It Matters |
|---|---|---|
| Bulk charge | Rated current | Fastest safe recharge |
| Absorption | 14.2-14.6V | Fully saturates cells |
| Float | ~13.5V | Prevents overcharge stress |
| Low-voltage cutoff | 11.0-11.5V | Protects cycle life |
Cold Weather Charging: The Safety Gap Most Guides Miss
Charging a lithium battery below 0°C causes permanent damage through lithium plating, yet most installation guides ignore this risk entirely. If you camp in shoulder seasons or store your van unheated, you need either a battery with built-in low-temperature cutoff or an external heating pad.
SRNE's lithium-compatible charge controllers include temperature-compensated charging profiles that automatically suspend charging when the battery temperature sensor reads below 0°C. For Skyenergi batteries without internal heating, a 12V silicone heating pad placed under the battery and controlled by a thermostat is a common workaround. Never rely on the BMS alone to prevent cold charging, by the time the BMS cuts off, some damage may already have occurred.
Interpreting BMS App Data
Bluetooth monitoring is standard on Skyenergi and SRNE systems, but knowing what to look for matters more than having the app. Check cell balance regularly: a healthy pack stays within 0.05V between cells. If one cell drifts higher, the BMS is working harder to balance, and capacity may be reduced. State of health (SOH) below 80% indicates the battery is nearing end of life. Charge and discharge current limits should never be exceeded, if your app shows repeated current limiting, your charger or loads are too aggressive.
Common Mistakes to Avoid When Installing a Lithium Campervan Battery
The most common mistake is treating a lithium campervan battery as a direct swap for lead-acid. It is not, and the failures we see trace back to a handful of repeated errors.
Skipping the DC-to-DC charger tops the list. Without it, a smart alternator will not charge the bank properly, and a dumb one can overheat. Second is undersized cable, which causes voltage drop and appliance dropouts. Third is grounding to a random chassis point instead of a clean, dedicated earth. Fourth is leaving the old solar controller on a lead-acid profile. Fifth is mounting the battery loose, which risks terminal damage and, in the worst case, an internal short.
Get these right and the installation is straightforward. Get them wrong and you will be troubleshooting from the roadside.
Frequently Asked Questions
Can I just put a lithium battery in my camper without changing anything else?
Not usually. A lithium campervan battery is not a simple drop-in replacement for lead-acid in most setups. Your existing charger will likely have a lead-acid charging profile that won't fully charge lithium and can damage it over time. You'll also need to check your split charge relay or alternator charging method, as many older systems aren't compatible. SkyEnergi's 2026 upgrade guide recommends a systematic assessment of your electrical setup before installation, including checking your charger, DC-to-DC capability and cable sizing.
What size fuse do I need for a 100Ah lithium leisure battery?
For a 100Ah lithium battery, a 100A to 150A main fuse is typical, but the correct size depends on your cable gauge and the maximum current your system will draw. The fuse protects the cable, not the battery, so it must be rated below the cable's current-carrying capacity. Use a fuse rated at least 25% above your expected continuous load but below your cable's safe limit. Always install the main fuse as close to the battery positive terminal as possible.
Do I need a DC-to-DC charger when installing a lithium battery?
Yes, in most modern installations. A DC-to-DC charger regulates the voltage from your vehicle's alternator to safely charge a lithium battery. Without one, your alternator may overheat trying to charge a deeply discharged lithium bank, or the battery may not charge fully. The charger also isolates your starter battery from your leisure battery, preventing you from draining the vehicle's starting power. SkyEnergi supplies DC-to-DC chargers designed to work with their Edge and Elite lithium ranges.
How do I set the charging profile for a lithium campervan battery?
Lithium batteries require a specific charging profile: bulk charge to around 14.2V to 14.6V, absorption phase at that voltage until current drops to near zero, then float at 13.5V to 13.8V. Unlike lead-acid, lithium doesn't need equalisation and shouldn't be trickle-charged indefinitely at high voltage. Check that your solar charge controller, DC-to-DC charger and mains charger all support lithium profiles. SRNE charge controllers and SkyEnergi's recommended charging equipment include preset lithium modes.
The real challenge with any lithium upgrade is not the wiring itself but matching the battery, charger and monitoring kit so the whole system works as one. Skyenergi supplies the full chain, from the Edge and Elite lithium batteries to DC-to-DC chargers, MPPT solar controllers and SRNE charging and monitoring systems, with UK-based support and fast delivery. Browse the range and get the components sized to your build before your next trip.
Prev post

DC to DC Charger: The 2026 Buyer's Guide
Updated on 15 September 2026
Next post

7 Best Flexible Solar Panels for Campervans UK (2026)
Updated on 13 September 2026


