


How to Monitor Caravan Water Tank Levels: 7 Methods
Learn how to monitor water tank levels in a caravan, from sensor types and probe fitting to 12V wiring and troubleshooting unreliable readings.
Quick Summary
The most reliable way to monitor water tank levels in a caravan is to fit an electronic probe in the tank and connect it to a display. The probe reads the water level before the tap runs dry, so you can plan refills and avoid running the pump dry.
- Caravan tanks are often hidden under benches, so guessing the level by eye is unreliable.
- Electronic probes send a signal to a display, showing the level from empty to full.
- Probe length must match tank depth; a probe that doesn't reach the bottom can give a false empty reading.
- Check probe seating and connections before replacing a sensor, since most bad readings come from setup.
Table of Contents
- Why Caravan Water Tank Levels Are Hard to Judge by Eye
- Types of Water Tank Level Monitoring Systems
- How Tank Probes, Sensors and LED Gauges Work
- 12V Water Tank Level Sensor Wiring and Installation, Step by Step
- Fitting a Caravan Waste Water Tank Level Monitor Safely
- Getting Accurate Readings in Irregular Tanks
- Water Tank Sensor Troubleshooting: Fixing Wrong or Failed Readings
- Choosing Your Probe and Setting Up Your Monitoring System
- Frequently Asked Questions
Why Caravan Water Tank Levels Are Hard to Judge by Eye
Most caravan owners guess how much water they have left, and few can check their water tank levels at a glance. You turn the tap, the pump runs, and then the water stops. By then it's too late to fill up.
Caravan water tanks are often tucked under benches or inside locker spaces, so you can't simply look inside. Tanks also rarely sit level, and their shapes can be irregular, which makes a simple "full or empty" guess unreliable.
A reliable monitor solves this. It tells you the level before the tap runs dry, so you can plan refills, manage grey water and avoid running the pump dry.
Types of Water Tank Level Monitoring Systems
Most setups fall into a few broad categories. The right choice depends on whether you track fresh water, waste water or both.
- Electronic probes sit in the tank and send a signal to a display.
- Gauge displays show the level on a panel inside the caravan.
- Mechanical float gauges rely on a float arm moving with the water level.
Fresh-Water Tank Level Monitoring
Fresh-water monitoring is about planning. You want to know how long your supply will last before you need to refill at a site or tap.
For this job, an electronic probe paired with a display works well. Electronic tank probes suit fresh-water tanks. The Skyenergi Water Tank Probe 200mm for SRNE CU2 and Water Tank Probe 250mm for SRNE CU2 are compatible with the SRNE CU2 data system, giving readings you can check at a glance.
Grey-Water and Waste-Water Tank Monitoring
Waste-water tanks are the opposite problem. You want an early warning before the tank fills, so you can empty it at the right time.
The same electronic approach works for waste tanks, provided the probe is rated for that use. Choose a probe designed for waste water and check the tank opening size before buying.
How Tank Probes, Sensors and LED Gauges Work
Most electronic systems use a probe with metal sensing rods. As water rises, the probe's electrical resistance changes. The display reads that change and converts it into a level.
Here is what that means in practice:
- The probe measures resistance, not water directly.
- Readings depend on the probe sitting correctly in the tank.
- LED gauges show the level in steps, usually from empty to full.
Watch out: A probe that doesn't reach the bottom of the tank can give a false "empty" reading. Check the probe length against your tank depth before you fit it.
12V Water Tank Level Sensor Wiring and Installation, Step by Step
Fitting a 12V monitor is a straightforward DIY job, but doing it properly means planning the cable route, protecting the circuit, and testing before you fill the tank. Work through this sequence in order.
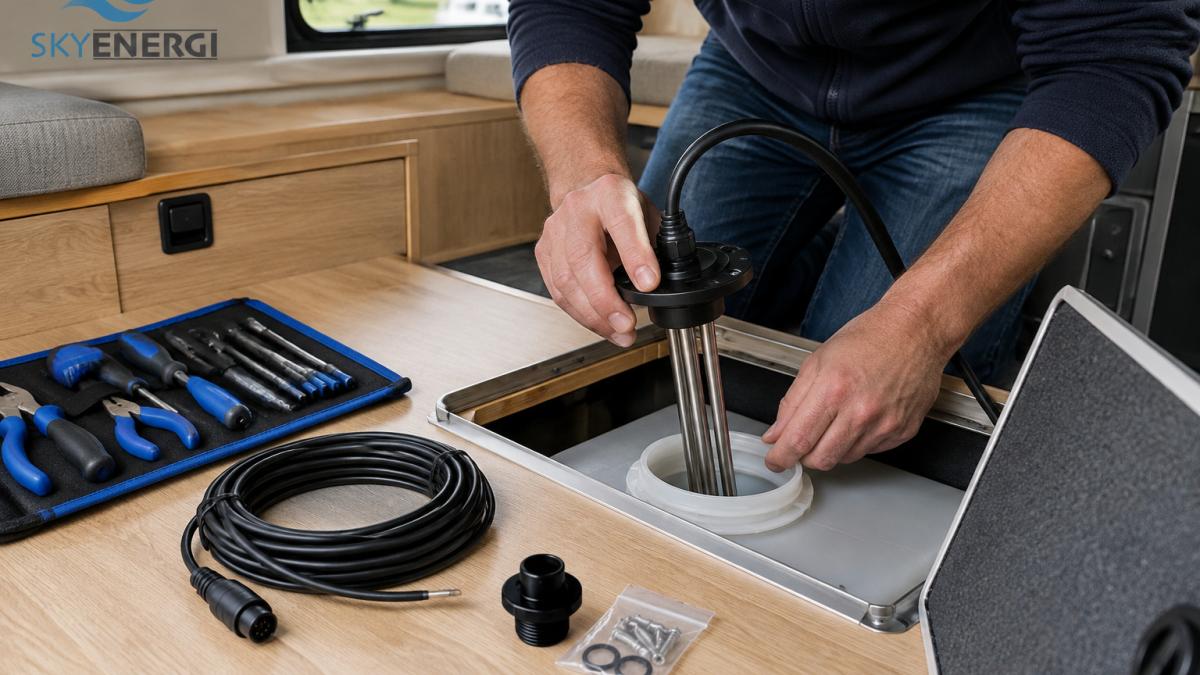
Tools and materials you'll need:
- Drill with a hole saw sized to your probe's mounting thread
- Screwdrivers and a spanner set
- Wire strippers and crimping tool
- 12V automotive cable (typically 1.0-1.5 mm² for short runs)
- Inline blade fuse holder and a fuse rated to the display's current draw (check the instructions; 1A or 2A is common)
- Heat-shrink tubing and self-amalgamating tape
- Cable clips or conduit
- Silicone sealant suitable for potable water if sealing around the tank opening
Step 1, Isolate the power. Turn off the leisure battery isolator and remove the fuse from the circuit you'll be working on. Confirm the display is dead before you start.
Step 2, Measure and select the probe. Measure from the top of the tank opening to the base. Probes are designed to sit slightly short of the bottom so they don't rest in sediment. The Water Tank Probe 175mm For Srne Cu2 suits many common installations; check the SRNE probe range for 150mm and 225mm options if your tank is shallower or deeper.
Step 3, Prepare the tank opening. If there's no existing port, drill carefully with a hole saw, keeping swarf out of the tank. Fit the supplied rubber gasket and mounting nut, and tighten so the seal compresses evenly. Do not overtighten, it can distort the gasket and cause a leak.
Step 4, Fit the probe. Lower the probe into the tank, keeping the sensing rods clear of the base and any baffles. Route the cable through the gasket and tighten the gland. If the cable passes through a locker or floor, add a grommet to prevent chafing.
Step 5, Run the cable. Keep the cable away from hot pipes, moving parts, and sharp edges. Use cable clips or conduit, and leave a small drip loop where the cable enters the tank so water runs off rather than into the connection.
Step 6, Wire the display. Connect the probe cable to the display according to the colour codes in the instructions. Fit the inline fuse holder on the positive feed as close to the battery or distribution point as practical. Make all joints with crimped connectors and cover them with heat-shrink tubing, twisted-and-taped joints are a common source of intermittent readings.
Step 7, Test before filling. Switch the power back on and check the display shows a reading. Add water in stages and confirm the reading moves. If it doesn't, recheck the connections and probe seating before assuming a fault. Once the reading responds reliably to staged filling, managing water usage also means checking how quickly showers draw down the tank.
Watch out: A probe that isn't fully seated or a cable gland that isn't tight can cause a false empty reading or a slow leak, check both before you fill the tank for a trip. For a complete integrated setup, the Srne Eco System Complete 12v Kit Cu2 Rma7 Bs48500 Saa bundles the monitoring hardware and can simplify planning.

Fitting a Caravan Waste Water Tank Level Monitor Safely
Waste-water tanks need extra care. Work with the tank empty, wear gloves and use the correct tools.
Use only the fixings supplied with the probe. A loose or poorly sealed fitting can leak, and leaks in waste systems cause hygiene and damage problems. Keep the cable clear of the drain outlet and any moving parts.
If you're fitting the complete system, the Srne Eco System Complete 12v Kit Cu2 Rma7 Bs48500 Saa provides integrated monitoring hardware, which can make a neat installation easier to plan.
Getting Accurate Readings in Irregular Tanks
Many caravan tanks aren't simple boxes. They have curves, corners and baffles, so the level doesn't rise evenly.
Here's how to get the most reliable reading:
- Fit the probe in the deepest, most central point where possible.
- Expect small inaccuracies near the top and bottom of the range.
- Calibrate the display on a full fill, then check the reading as the tank drops.
Accuracy varies by tank shape, so treat the display as a guide, not an exact measure.
Water Tank Sensor Troubleshooting: Fixing Wrong or Failed Readings
Most bad readings trace back to installation or calibration rather than a failed probe. Work through these checks in order before replacing anything.
1. Confirm power and fuse. Check the display powers on and the inline fuse is intact. A blown fuse often means a short in the wiring, so inspect the cable run for chafing before replacing it.
2. Check the probe seating. A probe that isn't fully submerged when the tank is full will read empty. Confirm the probe length matches the tank depth and that the sensing rods are clear of the base and walls.
3. Inspect connections. Loose crimps, corroded terminals, and twisted-and-taped joints cause jumping or intermittent readings. Remake any suspect joint with a proper crimp and heat-shrink.
4. Clean the probe. Fresh-water deposits and waste-water residue can coat the sensing rods and skew readings. Remove the probe, clean it according to the manufacturer's instructions, and refit. A maintenance schedule of checking the probe each season is sensible.
5. Calibrate against measured volume. Fill the tank from empty in known increments (for example, using a 10-litre container) and note the display at each step. This shows whether the reading is linear or compressed at one end, common in irregular tanks. Adjust the display's calibration if your unit supports it, or note the offset for future reference.
6. Account for tank shape. Curved, baffled, or tapered tanks don't rise evenly, so a percentage reading will always be approximate near the top and bottom. Fit the probe at the deepest central point where possible and treat the display as a guide rather than a precise gauge.
Watch out: Don't replace a probe before checking the wiring and calibration, most failed readings come from connections or setup, not the sensor itself. If you've worked through these steps and the reading still doesn't respond, test the probe against a known-good display or consult the SRNE instructions for your model.
Choosing Your Probe and Setting Up Your Monitoring System
Pick your probe length by measuring the tank depth from the opening to the base. Remember that probes sit slightly short of the very bottom to ensure correct operation.
- For a shallower tank, the Water Tank Probe 150mm For Srne Cu2 may be the right fit.
- For a deeper tank, the Water Tank Probe 225mm For Srne Cu2 gives you the extra reach.
- If you want a complete monitored setup, the Srne Eco System Starter Kit brings the components together.
Once installed, check the reading against the actual water you add. Over a few trips, you'll learn how your tank behaves and when to refill, so you're never caught short on the road.

Frequently Asked Questions
How do you check the water level in a caravan tank?
The simplest check is an electronic level sensor or probe that reports fill level on a display at the control panel. Without one, you can only estimate by timing a tap run or weighing portable containers, which is imprecise. A probe-based system, such as the Skyenergi Water Tank Probe 200mm or 250mm for SRNE CU2, sends readings to a monitor so you can see fresh and waste levels without opening the tank. Check the tank's rated capacity first so you can convert readings into litres.
How does a caravan water tank level sensor work?
Most caravan level sensors measure resistance or electrical signal changes as the water level rises. A probe inside the tank contains sensing rods; as water covers them, the resistance changes, and the control unit converts that into a fill percentage. Probes such as the SRNE CU2 compatible range work across a 0 to 190 ohm resistance range. Because the reading depends on the sensing rods being immersed, the probe will not show the very bottom of the tank, so allow for that when interpreting empty readings.
Where should a water level sensor be fitted in a caravan tank?
Fit the probe through the tank's 40mm opening, which the SRNE-compatible probes are designed to suit, using the supplied rubber gasket and mounting nut to seal it. Position it so the sensing rods run vertically from near the top to just above the base, avoiding baffles, pump inlets and the fill point where turbulence gives false readings. Check the tank drawing or manufacturer's guidance before drilling or enlarging any opening.
Why is my caravan water tank gauge giving an incorrect reading?
Common causes are a probe that is not fully immersed, a build-up of scale or residue on the sensing rods, loose wiring, or a reading calibrated for a different tank shape. Start by cleaning the rods, checking every connection, and confirming the probe length matches the tank depth. If the reading still jumps, drain and refill the tank to see whether the display tracks the change, then recheck the wiring and gasket for leaks or poor contact.
Probe lengths available for SRNE CU2 tanks

Prev post

SRNE DB12 Distribution Box: 7-Step Installation Guide
Updated on 09 November 2026
Next post

How to Claim Solar Panel Grants and Tax Relief in the UK
Updated on 07 November 2026


