





Connect Solar Panels in Parallel for Caravans
Connect solar panels parallel: Learn how to connect multiple solar panels in parallel for your caravan. Step-by-step guide covering wiring, safety.
Table of Contents
- Series vs Parallel Solar Wiring: Which Works Best for Caravans
- How to Connect Multiple Solar Panels in Parallel
- Fusing Solar Panel Circuits for Safety
- MPPT Solar Charge Controller Sizing for Parallel Arrays
- Voltage Drop Calculations for Caravan Cable Runs
- Troubleshooting Common Parallel Connection Failures
- Frequently Asked Questions
Last Updated: September 28, 2026
Series vs Parallel Solar Wiring: Which Works Best for Caravans
When you're building a solar system for your caravan, the way you connect solar panels parallel makes a real difference. Series wiring increases voltage. Parallel wiring increases current output. For most caravan setups, connect solar panels parallel because it keeps voltage stable and lets you add panels without upgrading your charge controller.
The choice matters because it affects how your system performs in shade, how your battery charges, and whether your existing equipment can handle the setup. According to Smart RV Hub's 2026 wiring guide, parallel configurations are now the standard for DIY caravan installations because they integrate better with MPPT charge controllers and modern lithium battery systems.
Parallel wiring means connecting the positive terminals of all panels together, then connecting all negative terminals together. This keeps voltage constant (usually 12V or 24V) while adding up the current from each panel.
How to Connect Multiple Solar Panels in Parallel
Parallel wiring lets each panel operate independently while feeding power into a shared battery bank.
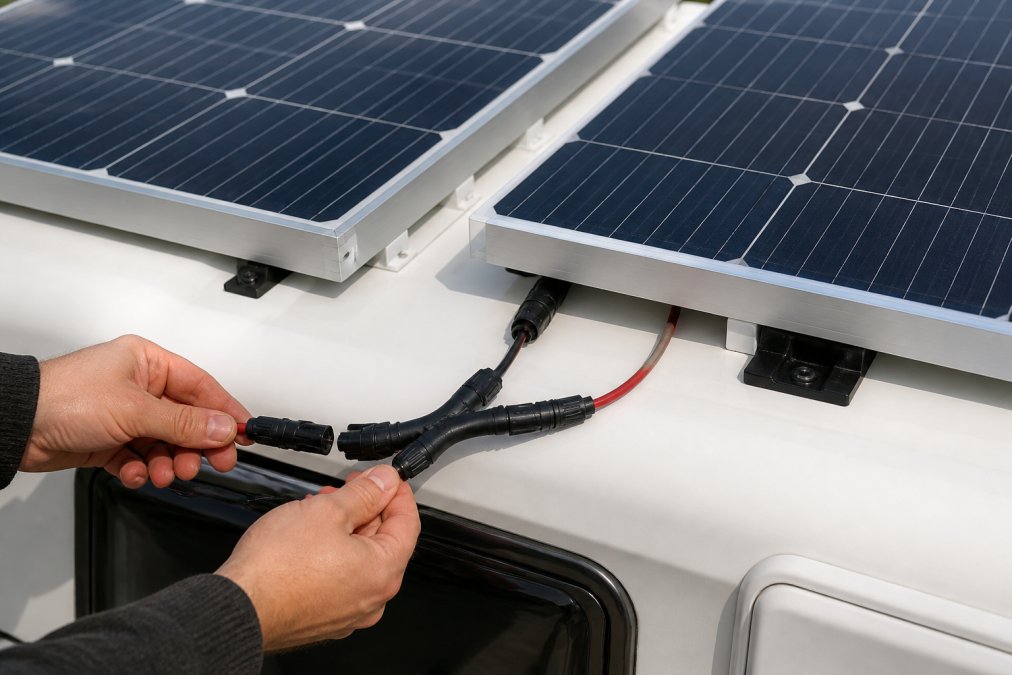
Step 1: Gather Your Tools and Components
Essential tools:
- Wire strippers, crimpers for MC4 connectors, multimeter, weatherproof tape, cable ties, fuse holders and breakers
Required components:
- MC4 connector pairs (male and female), Skyenergi's MC4 Solar Panel Cable Connector Pair comes in 5-pair sets at £2.99 per pair
- Y-branch adapters (also called solar splitters) for combining panels
- Photovoltaic solar cable rated for outdoor use, Skyenergi's 6mm solar cable costs £1.24 per metre
- Fuses and breaker switches
- Cable entry glands for weatherproofing
Step 2: Plan Your Wiring Layout and Cable Runs
Plan your layout to minimise cable runs and voltage drop. For most caravans, combine panels on the roof using a Y-branch adapter, then run a single cable down to your charge controller inside.

Step 3: Connect Panels Using MC4 Connectors and Y-Branch Adapters
MC4 connectors are the industry standard because they lock securely and resist weather damage. Strip 8mm of insulation from each wire end, crimp male connectors to positive wires and female to negative wires, test polarity with a multimeter, then attach each panel to a branch of your Y-adapter. Once all panels are connected, measure voltage at the adapter output, it should match your single panel voltage (usually 12V or 24V), not add up.
The Y-adapter combines all positive terminals and all negative terminals into a single output. Victron Energy's MC4-Y solar splitter is a professional-grade option at £10.30 and handles up to 50A, making it suitable for most caravan arrays.
Ensure connectors are fully seated. A half-connected MC4 connector creates resistance, heat, and potential fire hazard.
Step 4: Route and Secure Cables with Weatherproofing
Run cables in conduit or cable tray wherever possible. On your caravan roof, use cable clips rated for outdoor use, spaced every 30cm, and route cables away from sharp edges and metal corners.
Where cables enter your caravan, use a Skyenergi Solar Panel Entry Gland (£4.75) to create a waterproof seal. This double-cable entry gland fits 3-7mm cables and prevents water from entering your caravan interior, the leading cause of electrical failures in mobile systems.
Apply weatherproof sealant around all cable entries. Use silicone rated for outdoor use, not standard caulk. Caulk cracks over time and lets water in.
Fusing Solar Panel Circuits for Safety
Install a DC breaker between your panel array and charge controller, rated for your system's maximum short-circuit current (typically 20-50A). Place it as close as possible to the controller to minimise unprotected cable length. Use DC-rated breakers only, AC breakers fail silently on DC. Label it "Solar Array" and check annually that it moves freely.
MPPT Solar Charge Controller Sizing for Parallel Arrays
Your charge controller regulates voltage and current from your panels to charge your battery safely. MPPT controllers extract more power than PWM controllers, especially in low-light conditions. When you wire panels in parallel, your controller must handle the total current from all panels combined.
Sizing formula: Add up the short-circuit current of each panel and multiply by 1.25 for safety margin. Example: Two 400W panels with 12A short-circuit current each = 24A total × 1.25 = 30A minimum controller rating.
According to Star Power Advance Solar Technology's 2026 guidance, MPPT controllers are now the preferred choice for caravan systems because they adapt to variable input voltage and maximise charging efficiency across different weather conditions and battery states.
Choose a controller with DC input rated for your system voltage (12V, 24V, or 48V) and output current at least 25% higher than your calculated panel current. Skyenergi supplies MPPT controllers as part of their complete 12V energy management solutions, designed specifically for caravan and off-grid lithium systems.
Voltage Drop Calculations for Caravan Cable Runs
Voltage drop is power lost as electricity travels through cable. Even a 5-metre run can lose 0.5-1V if the cable is too thin, reducing charging speed and battery lifespan.
Voltage drop formula:
(Current × Cable Length × 2) ÷ (Cable Cross-Section × Conductivity) = Voltage Drop
For practical caravan use, apply this simpler rule: keep voltage drop under 3% of your system voltage.
- For a 12V system: 3% = 0.36V maximum acceptable drop
- For a 24V system: 3% = 0.72V maximum acceptable drop
Worked example for a typical caravan setup:
MC4 Solar Panel Cable Connector Pair →
You're installing two 400W panels in parallel on your caravan roof. Each panel outputs 12V and 33A (short-circuit current). Your cable run from the roof combiner to the charge controller inside is 8 metres (measured along the actual route, including bends around the roof edge and down the side wall).
Total current from both panels: 33A + 33A = 66A Cable length (one-way): 8 metres Using 6mm² cable (common for cost reasons):
Voltage drop = (66A × 8m × 2) ÷ (6mm² × 58) = 1056 ÷ 348 = 3.03V
This exceeds your 3% limit (0.36V). Your panels output 12V, but only 8.97V reaches your controller. You've lost 25% of your voltage, your controller can't charge your battery efficiently, and you're wasting solar energy.
Solution: Upgrade to 10mm² cable.
Voltage drop = (66A × 8m × 2) ÷ (10mm² × 58) = 1056 ÷ 580 = 1.82V
Now you're at 10.18V at the controller, acceptable, though still slightly high.
Voltage drop = (66A × 8m × 2) ÷ (16mm² × 58) = 1056 ÷ 928 = 1.14V
| Cable Run Length | 30A Current | 50A Current | 70A Current |
|---|---|---|---|
| 0-5 metres | 6mm² | 10mm² | 16mm² |
| 5-10 metres | 10mm² | 16mm² | 25mm² |
| 10-15 metres | 16mm² | 25mm² | 35mm² |
| Over 15 metres | 25mm² | 35mm² | 50mm² |
Practical tip for caravan installations:
Troubleshooting Common Parallel Connection Failures
Problem: System won't charge at all, or charges very slowly
Start with the basics:
-
Check MC4 connectors. Disconnect and reconnect firmly until you hear a click. A half-connected MC4 connector creates resistance, heat, and potential fire hazard.
-
Measure voltage at each panel. Use your multimeter to check voltage directly at each panel's output terminals (before the MC4 connectors). Each panel should read its rated voltage (usually 12V or 24V). If a panel reads 0V, it may be shaded, disconnected, or faulty. Unshade it and retest.
-
Measure voltage at the Y-adapter output. After connecting all panels, voltage should equal a single panel's voltage, not add up. If you see 24V from two 12V panels in parallel, you've wired them in series by mistake. Disconnect and rewire.
-
Measure voltage at your charge controller input. If voltage here is significantly lower than at the Y-adapter (more than 0.5V difference), your cable is too thin or too long. See the Voltage Drop section above for cable sizing.
Problem: Voltage is lower than expected at the controller
Problem: Current is lower than expected
Problem: System shuts down unexpectedly
Problem: Water ingress around cable entry points
- Disconnect your panels immediately.
- Dry all connectors thoroughly with a clean cloth.
- Inspect your cable entry gland. If it's cracked or loose, replace it with a Skyenergi Solar Panel Entry Gland (weatherproof, fits 3-7mm cables).
- Reapply silicone sealant around all cable entries. Use outdoor-rated silicone, not standard caulk.
- Reconnect and test voltage before relying on the system.
Frequently Asked Questions
Is it better to connect solar panels in series or parallel for a 12V caravan system?
For most caravans, parallel wiring is better. Parallel connections maintain your 12V system voltage while increasing total amperage output. Series wiring raises voltage, which requires a different charge controller and battery setup. Parallel is simpler for existing 12V systems and reduces voltage drop over cable runs, keeping your fridge and appliances running reliably. However, parallel requires careful panel matching to avoid efficiency losses.
What equipment do I need to connect multiple solar panels in parallel?
You'll need MC4 connectors (male and female pairs), a Y-branch adapter to combine panel outputs, appropriately sized solar cable (typically 6mm for caravans), fuses and breakers, a solar charge controller, and weatherproofing glands for roof penetrations. Skyenergi supplies MC4 connector pairs at £2.99 and Y-branch adapters at £10.30, plus 6mm solar cable at £1.24 per metre and entry glands at £4.75 for watertight installations.
How do I calculate the total current when wiring solar panels in parallel?
Add the short circuit current (Isc) rating of each panel together. If you have two 10A panels in parallel, your total current is 20A. This total determines your fuse rating and cable gauge. Undersizing either creates fire risk; oversizing wastes money. Always round up to the next standard fuse size and verify cable ampacity before installation to protect your system.
Can I mix different wattage solar panels in a parallel configuration?
Mixing panels is possible but not recommended. Different wattages mean different voltage outputs under load, causing the lower-output panel to act as a load on the higher one, reducing overall efficiency. Experts recommend matching panels precisely or using separate charge controllers for each type. If you must mix panels, monitor performance closely and consider upgrading to matched panels when budget allows.
Prev post

Sizing Solar Panels: A Campervan and Off-Grid Guide
Updated on 29 September 2026
Next post

Off-Grid Solar vs Wind Power for UK Homes
Updated on 28 September 2026


